


Blog / 27.05.2026
Affilare correttamente il coltello al primo utilizzo
Tre consigli per ottenere risultati perfetti con il tuo affilatore a rullo HORL®
Per ottenere un’affilatura costante e riproducibile con il tuo affilatore a rullo, è fondamentale impostare correttamente il filo della lama al primo utilizzo. I tre consigli che seguono ti spiegano perché la pazienza e la scelta dell’angolo corretto sono così importanti, come riconoscere e rimuovere la bava e quale ruolo hanno la qualità dell’acciaio e la storia del tuo coltello.
Consiglio 1: prenditi il tempo necessario e scegli l’angolo giusto
Quando utilizzi il tuo affilatore a rullo HORL® per la prima volta, dovrai innanzitutto adattare il coltello al nuovo angolo di affilatura. Questa procedura iniziale è essenziale per ottenere la massima affilatura possibile e poterla riprodurre con costanza nel tempo. Prenditi quindi il tempo necessario per questo passaggio.
Quanto tempo ci vuole per la prima affilatura?
Non è possibile prevedere con esattezza quanto ci vorrà per la prima affilatura, dipende da diversi fattori come la qualità dell’acciaio o la manutenzione effettuata finora sul coltello.
Mediamente ci vogliono cinque minuti. Tuttavia, a seconda del tipo e delle condizioni del coltello, può essere che ci voglia molto meno o un po' di più. Una volta completata questa affilatura iniziale, saranno sufficienti pochi passaggi per riportare rapidamente il tuo coltello preferito a un’affilatura ottimale.
Scegliere l’angolo corretto: 15° o 20°
L’angolo di 15°: molti coltelli possono anche raggiungere un'affilatura ancora più fine a 15°, a seconda delle condizioni della lama e della qualità dell’acciaio.
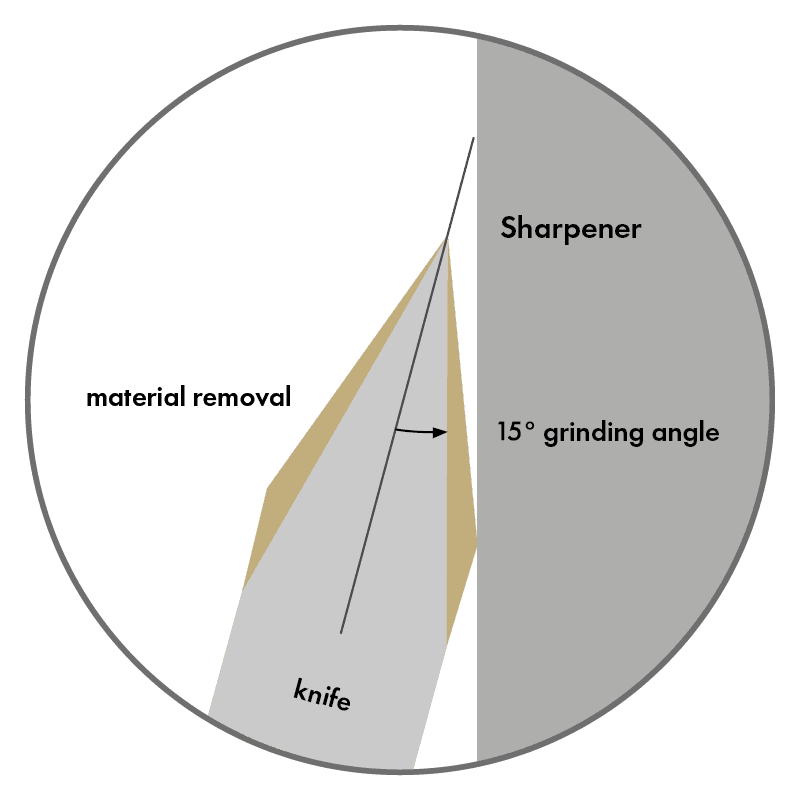
Nel caso di lame particolarmente robuste, passare a un angolo di 15° può richiedere una significativa asportazione di materiale e quindi più tempo. L’illustrazione mostra la quantità di materiale che deve essere rimossa affilando a un angolo di 15° un coltello robusto precedentemente affilato a 20°.

Come verificare i progressi: il metodo del pennarello
Il metodo del pennarello descritto nel seguente video ti aiuta a capire se puoi utilizzare l’angolo di 15° e a verificare visivamente l’affilatura.
Consiglio 2: come riconoscere e rimuovere la bava
Anche dopo aver effettuato un'affilatura omogenea, la presenza di una bava appena visibile può compromettere la qualità dell'affilatura (vedi immagine). Puoi capire se si è formata una bava o visivamente o se senti "graffiare” quando pulisci il coltello con un panno o con il cuoio. Puoi eliminarla con pochi passaggi.

Sbavare la lama con il cuoio
Perché la sbavatura è importante?
Queste immagini al microscopio mostrano perché quest’ultima fase del processo di affilatura è così importante. Dopo l'affilatura rimangono sul filo minuscoli residui metallici, la cosiddetta bava. Questi residui fanno sì che il coltello risulti ruvido al tatto e impediscono di raggiungere la massima affilatura. Solo dopo la sbavatura finale la lama diventa perfettamente liscia: il presupposto essenziale per un coltello davvero affilato.

Coltello con residui visibili dopo l’affilatura = non affilato


Coltello privo di bava dopo un'accurata pulizia = affilato
Consiglio 3: tieni conto della qualità dell’acciaio e della storia del tuo coltello
La qualità dell’acciaio e il modo in cui il coltello è stato utilizzato in passato possono influire sul risultato dell’affilatura. In genere, più elevata è la qualità dell’acciaio, migliore sarà il risultato finale.
Anche il modo in cui tratti il tuo coltello preferito contribuisce alla sua durata nel tempo e può influire sulla sua capacità di mantenere un’affilatura ottimale. Per fare in modo che il tuo coltello possa raggiungere un livello di affilatura professionale più e più volte, ti consigliamo di seguire queste due semplici indicazioni.
Affilatura meccanica
I sistemi di affilatura elettrici o meccanici possono generare rapidamente temperature elevate sulla lama. Una temperatura eccessiva può compromettere in modo permanente la struttura dell’acciaio, rendendo più difficile ottenere in seguito un’affilatura ottimale.
Lavastoviglie
A ogni ciclo di lavaggio, sale e calore incidono negativamente sulla struttura dell’acciaio della lama. Una volta danneggiata, la struttura non può essere ripristinata e ciò compromette il risultato dell’affilatura, fino a rendere impossibile ottenere un filo ottimale.
Hai bisogno di ulteriore assistenza?
Se hai delle domande, puoi contattarci tramite il nostro modulo di contatto. Ti basterà descrivere la tua richiesta nel campo dedicato e ti risponderemo il prima possibile. Il nostro team sarà lieto di aiutarti a ottenere il massimo dai tuoi coltelli.
From beginners to knife enthusiasts—the different HORL®3 models offer you all the options you need.
